Best Design Tutorials

Design Tutorials provides the best and educational tutorials for your skills improvement

Wikipedia

Search results

Showing posts with label photoshop. Show all posts
03:20:00

How to Paste an Image into a Selection in Photoshop


How to Paste an Image into a Selection in Photoshop

Learn how to paste an image into a selection using Photoshop's Paste Into command, and how to fix any perspective issues with your image after you paste it into the selection. Watch the video or follow along with the written tutorial.

Here's the first image I'll be using, which I downloaded from Adobe Stock. I'm going to draw a selection around the inside of the tv so I can paste a different image onto the screen.
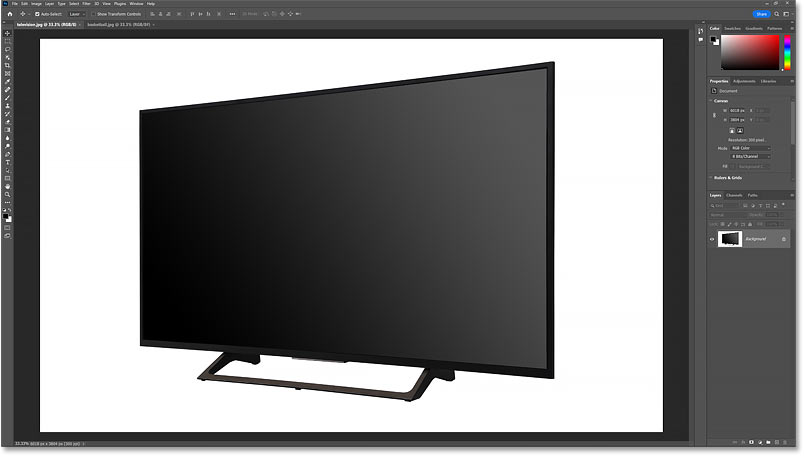
The image that the second image will be pasted into in Photoshop.
The original image.

Here's the image I'll paste into the selection, also from Adobe Stock.
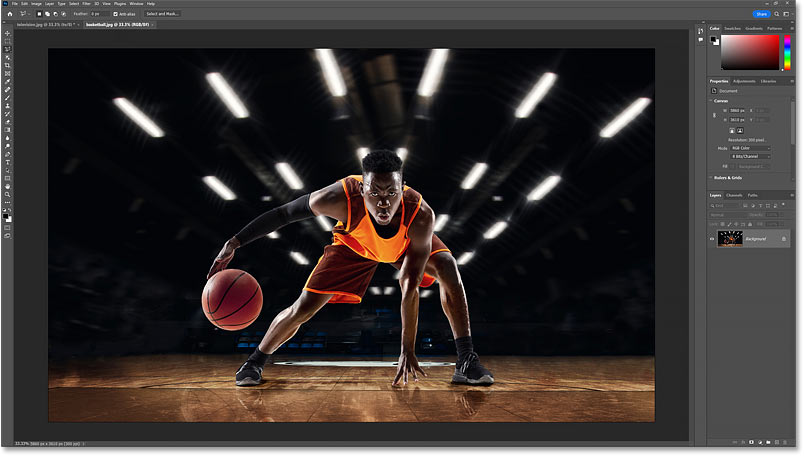
The image that will be pasted into the selection in Photoshop.
The image that will be pasted into the selection.

And here's what the final result will look like after pasting the image into the selection, resizing the image within the selection, and adjusting the perspective, all of which you'll learn how to do in this tutorial.

An image pasted into a selection in Photoshop.
The final effect.

Which version of Photoshop do I need?

I'm using Photoshop 2022 but any recent version will work. You can get the latest Photoshop version here.

Step 1: Select the area to paste the image into

As I mentioned, I want to select the area inside the tv so I can paste a second image onto the screen. Since the screen is just a polygon with straight sides, I can select it using Photoshop's Polygonal Lasso Tool.

In the toolbar, I'll click and hold on the standard Lasso Tool to show the other tools hiding behind it. Then I'll choose the Polygonal Lasso Tool from the menu.
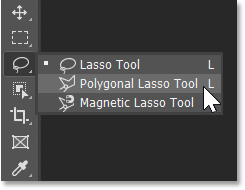
Selecting the Polygonal Lasso Tool in Photoshop.
Choosing the Polygonal Lasso Tool.

How to draw selections with the Polygonal Lasso Tool

To use the Polygonal Lasso Tool, you just click around the area you want to select to add points. Photoshop then connects the points with a straight line. So the idea is to click in the spots where the line needs to change direction. With my image, that would be the four corners of the screen.

I'll start by clicking in the upper left corner of the screen to add a starting point for the selection. Then moving clockwise, I'll click in the upper right corner to add a second point. I'll add a third point in the bottom right corner, and then a fourth point in the bottom left corner.

Don't click and drag with the Polygonal Lasso Tool. Just click to add a point and then release your mouse button. And if you make a mistake by clicking in the wrong spot, press the Backspace key on a PC or the Delete key on a Mac to undo your last point.
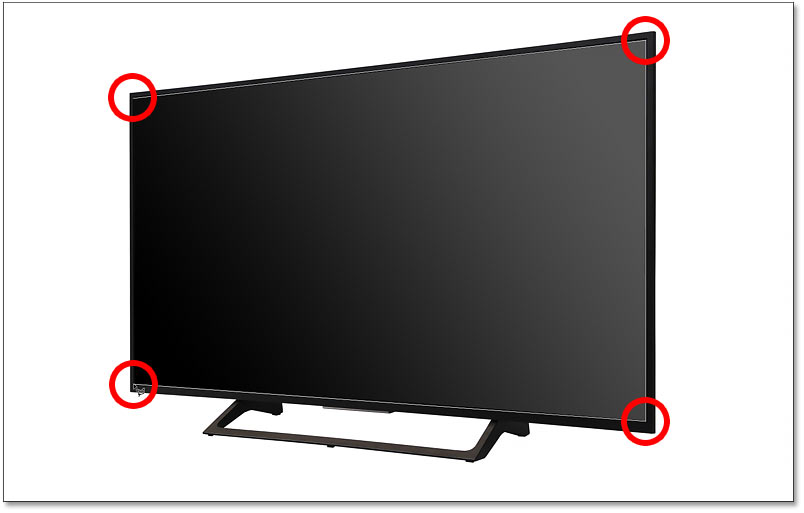
Clicking with the Polygonal Lasso Tool in each corner of the screen to add points.

To complete the selection, click again on your initial starting point. In my case, it's in the upper left corner.
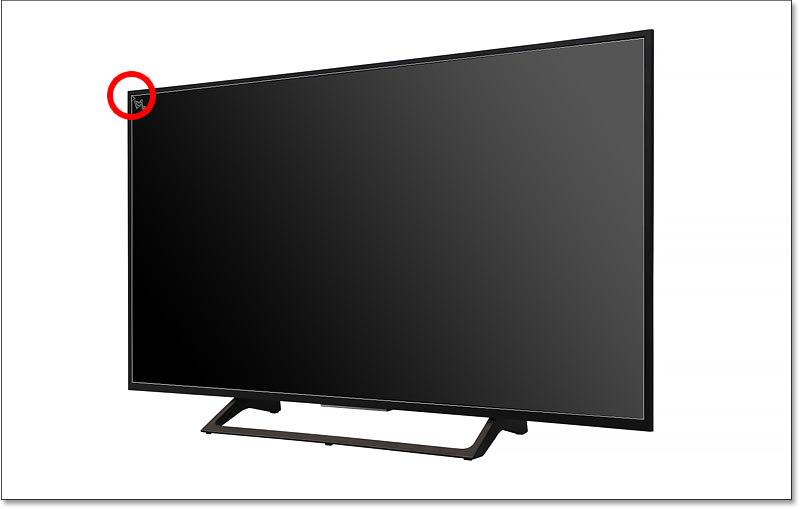
Clicking on the original starting point to complete the selection.

The selection outline appears, and we're ready to paste an image inside it.
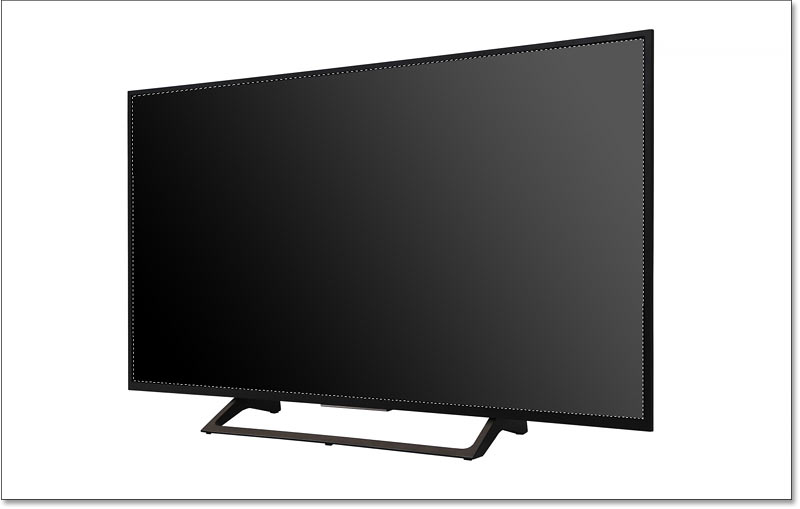
The area has been selected with Photoshop's Polygonal Lasso Tool.
The area is selected.


Step 2: Open the image to paste into the selection

With the selection in place, open the image you want to paste into it. My second image is already open so I'll switch over to it by clicking its document tab at the top.
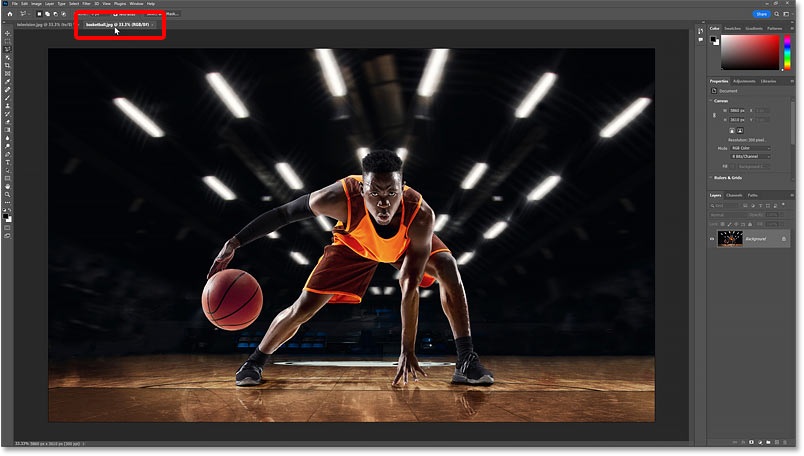
Opening the image to paste into the selection in Photoshop.
Opening the image to paste into the selection.

Step 3: Select and copy the image

Select the image by going up to the Select menu in the Menu Bar and choosing All. A selection outline will appear around it.
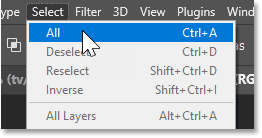
Choosing the Select All command in Photoshop.
Going to Select > All.

Then copy the image by going to the Edit menu and choosing Copy.
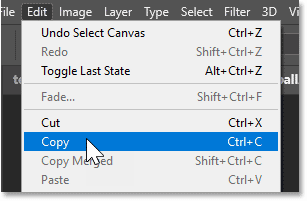
Choosing the Copy command in Photoshop.
Going to Edit > Copy.

Step 4: Switch back to your original image

Switch back to your first image (the one with the selection) by clicking its document tab.
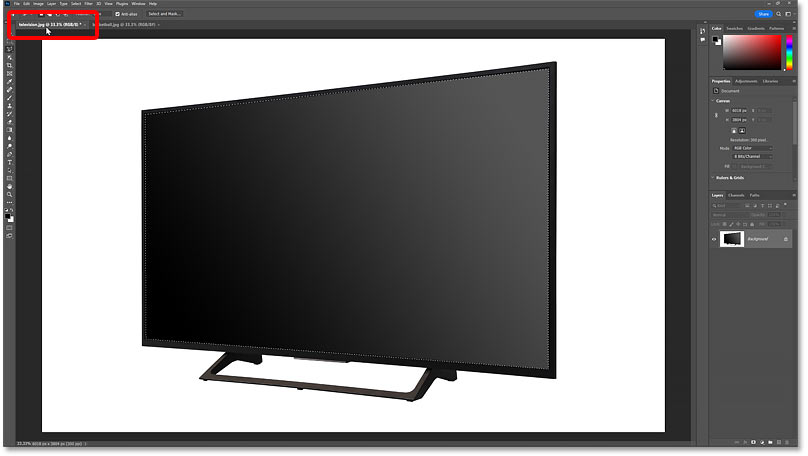
Switching back to the image with the selection.

Step 5: Paste the image into the selection

Then to paste the copied image into the selection, go up to the Edit menu, choose Paste Special and then Paste Into.
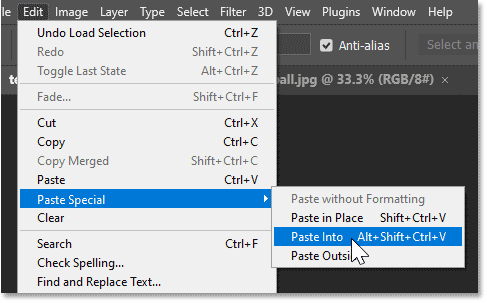
Choosing the Paste Into command in Photoshop.
Going to Edit > Paste Special > Paste Into.

The image appears inside the selection. So far so good.

But we still have some work to do. My subject is off-center, and the perspective is wrong. So we'll fix both of these problems next.

The initial result after pasting the image into the selection.

Photoshop converts the selection into a layer mask

Notice that after pasting the image into the selection, the selection outline has disappeared. That's because Photoshop converted the selection into a layer mask.

In the Layers panel, we see the mask in the layer mask thumbnail. The white part of the mask is the area we selected and where the image on the layer is visible. And the black part was the area outside the selection and where the image is hidden.
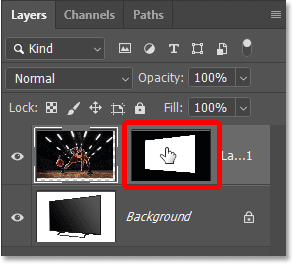
Photoshop's Layers panel showing the layer mask thumbnail.
The Layers panel showing the mask thumbnail.

If you hold the Shift key on your keyboard and click on the layer mask thumbnail, you'll temporarily turn the mask off.
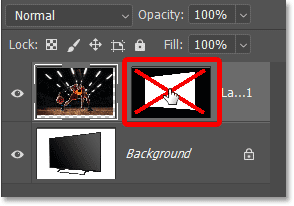
Hold Shift and click the thumbnail to turn the layer mask off.

With the mask off, the entire image is visible.
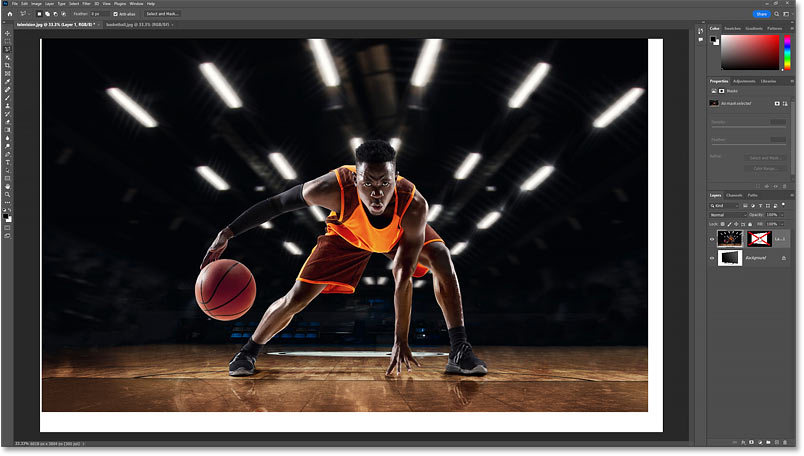
Turning the layer mask off reveals the entire image.

Click the layer mask thumbnail again to turn the mask back on and show the image only in the area you selected.
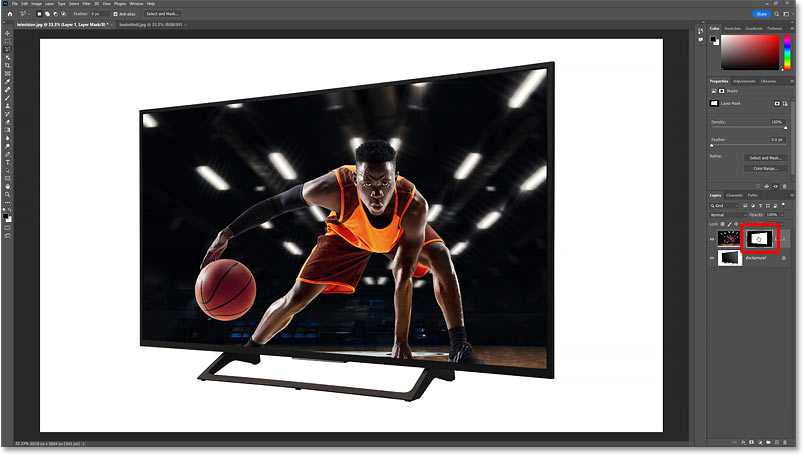
With the layer mask on, the image is visible only in the selected area.
The result with the layer mask on.

Step 6: Resize the image inside the selected area

Also notice in the Layers panel that the area between the image thumbnail and the mask thumbnail is empty. By empty, I mean we are not seeing a link icon.

Normally the image and its layer mask are linked together, which means that we can't resize one without resizing the other. But when we paste an image into a selection, the image and the mask are not linked, so we can resize the image without affecting the mask.
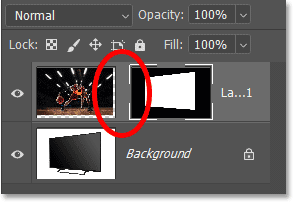
The image and the layer mask are not linked together in the Layers panel
The image and its layer mask are not linked together.

Make sure the image is active, not the layer mask, by clicking the image thumbnail.
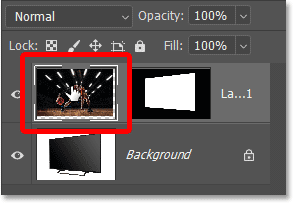
Clicking the image thumbnail in Photoshop's Layers panel
Clicking the image thumbnail.

Then go up to the Edit menu and choose Free Transform.
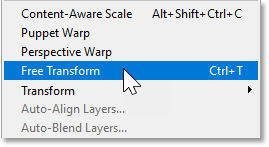
Selecting the Free Transform command in Photoshop
Going to Edit > Free Transform.

The Free Transform box and handles appear around the actual dimensions of the image, including the areas hidden by the layer mask.
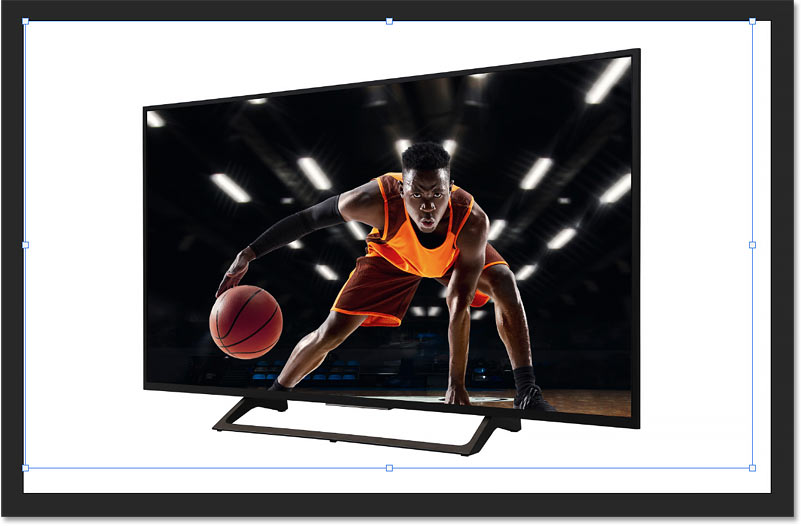
The Free Transform box and handles around the pasted image.
The transform box and handles around the pasted image.

To resize the image, click and drag the handles. In a moment, I'll show you how to fix any perspective issues with your image. But for now, I'll just focus on the width by dragging the side handles inward to the edges of the tv.
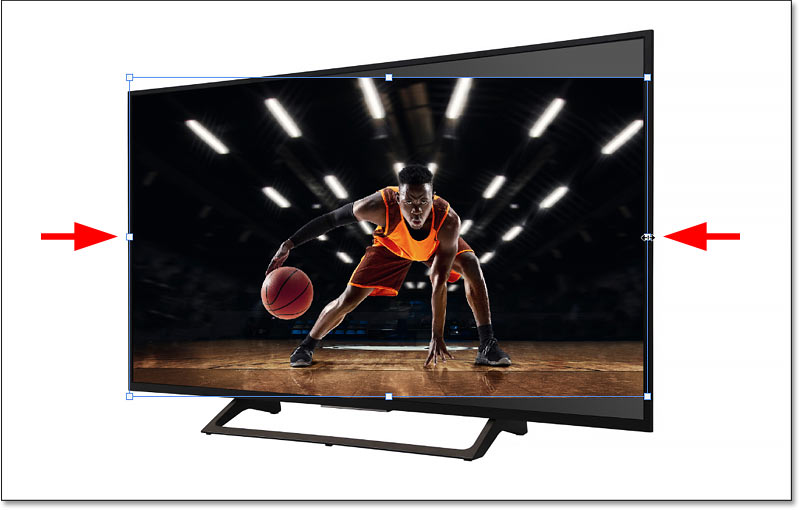
Resizing the pasted image inside the selected area.
Resizing the image inside the selected area.


Step 7: Adjust the perspective of the image

Since my pasted image is flat but the tv is on an angle, we have an issue with perspective. So to adjust the perspective, right-click inside the transform box and choose Perspective.
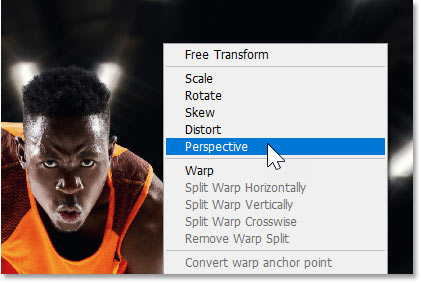
Right-click and choose Perspective from the transform menu.
Right-click and choose Perspective from the menu.

In Perspective mode, dragging a corner handle horizontally or vertically moves the handle in the opposite corner along with it but in the opposite direction.

So drag a corner handle up or down until the angles of both images are aligned. I'll drag the top right corner handle upward.
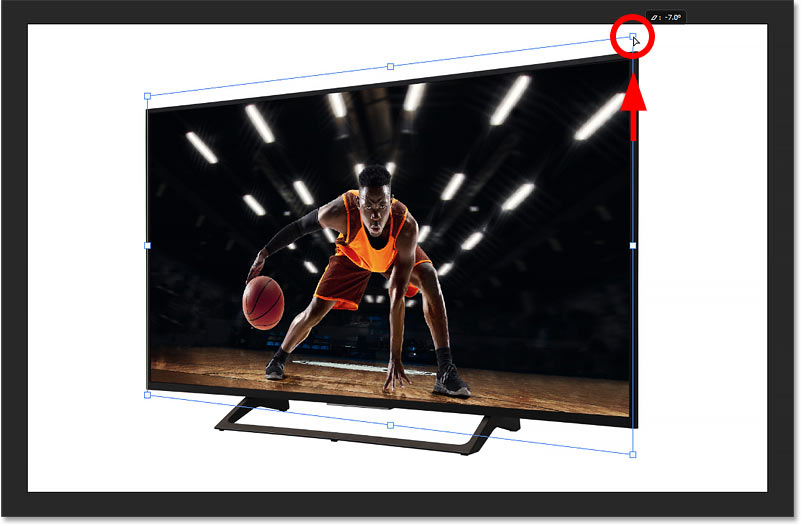
Aligning the top angles of the images using the Perspective command in Photoshop
Dragging the top right corner handle up to align the top angles of the images.


Fine-tuning the perspective with Distort mode

Sometimes Perspective mode is all you need to align the top and bottom angles together. Other times, like with my images, you can't align one without throwing the other one off.

Notice how the top angle is now correct but the bottom angle is not.
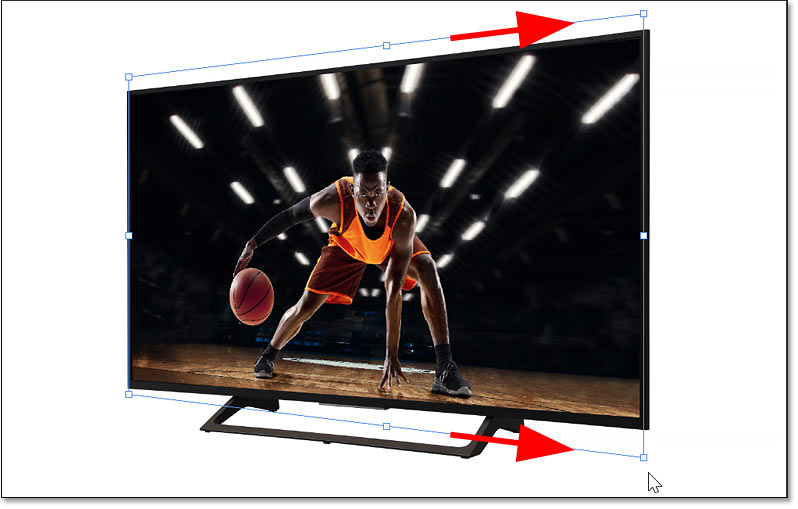
Perspective mode fixed the top angle of the image but not the bottom.

To fix that, right-click inside the transform box and switch from Perspective mode to Distort.
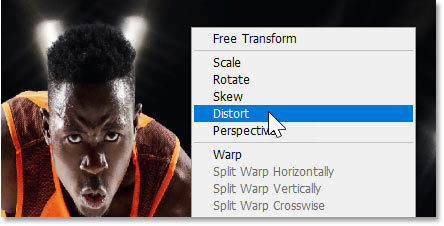
Choosing the Distort command from the transform menu.
Right-click and choose Distort from the menu.

In Distort mode, each corner handle can be moved independently. So I can drag the bottom right handle upward to align the bottom angles without affecting the top.

If you hold the Shift key on your keyboard as you drag, you'll limit the direction you can move, making it easier to drag straight up or down.
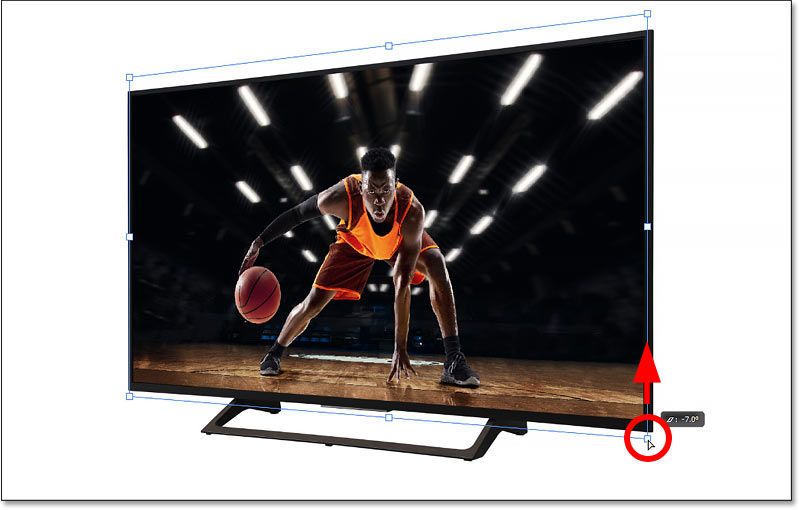
Fixing the remaining perspective issue with Distort mode in Photoshop.
Distort mode lets you drag any corner handle without moving the others.

Switching back to Free Transform mode

I actually want the basketball player to take up more room on the screen. But before I can resize the image again, I first need to right-click inside the transform box and switch from Distort or Perspective mode back to Free Transform.
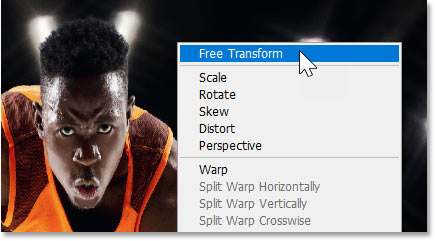
Switching back to Free Transform mode in Photoshop.
Switching back to Free Transform mode.

Then I can drag the corner handles outward to resize the image.
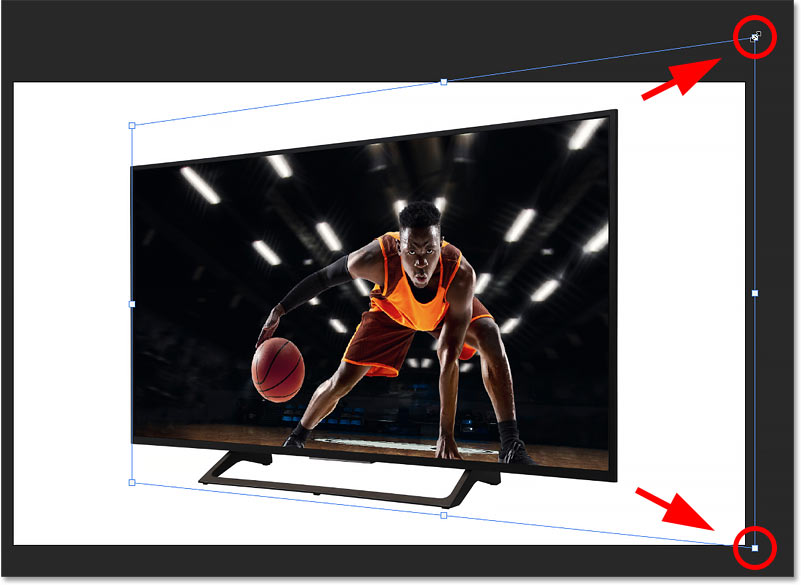
Resizing the image so the subject fills more of the selected area.
Resizing the image so my subject fills more of the area.

Repositioning the image

You can also drag inside the transform box to reposition the image and center your subject.
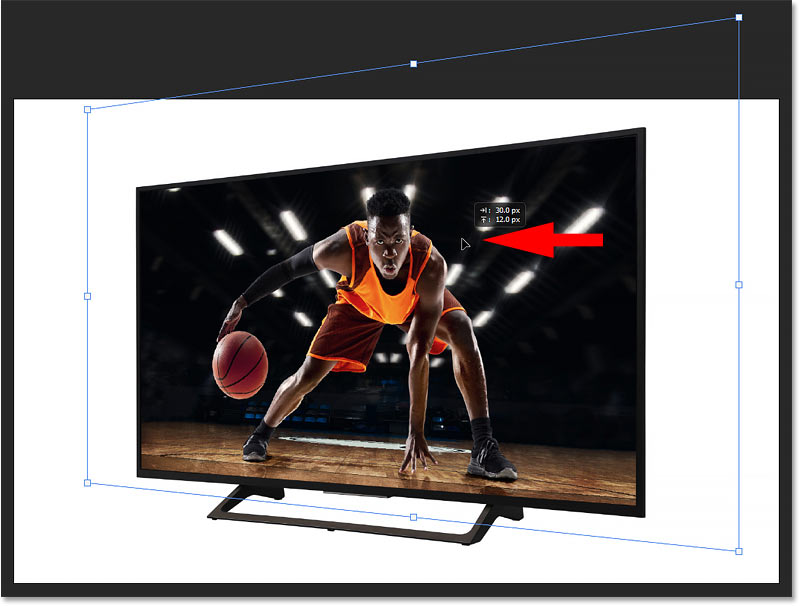
Repositioning the image inside the selected area.
Repositioning the image by dragging inside the transform box.

Fixing any new issues with perspective

If resizing the image threw off the perspective again, right-click inside the transform box and switch back to Distort mode.
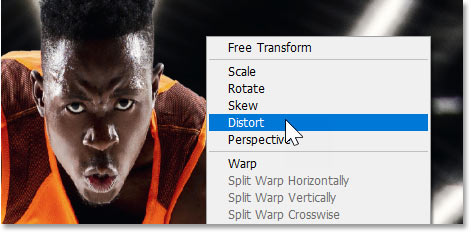
Reselecting Distort mode.
Switching back to Distort mode for a final touch-up.

Then drag any of the corner handles as needed.
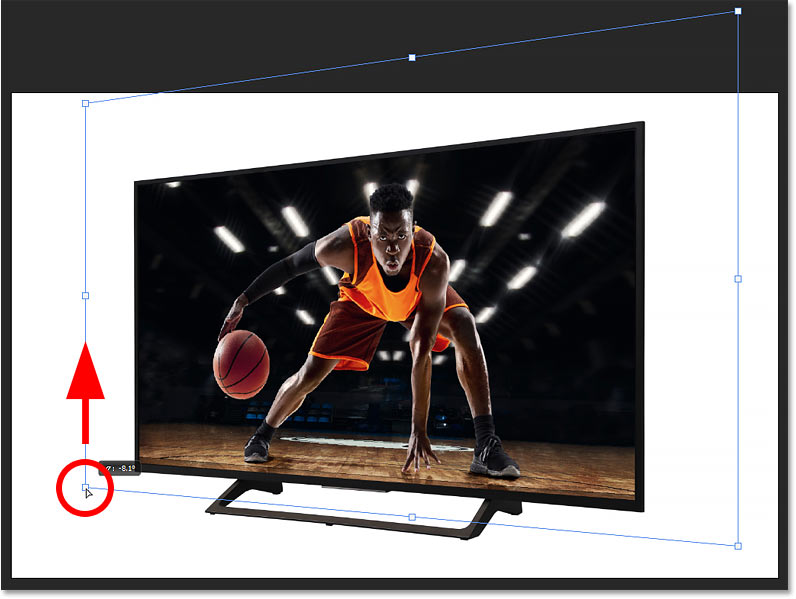
Fixing any new issues with the image perspective.

Step 8: Close Free Transform

To accept it and close Free Transform, click the checkmark in the Options Bar.

Closing Free Transform by clicking the checkmark in the Options Bar
Clicking the checkmark.

And here, after resizing the image, centering my subject on the screen and fixing the remaining perspective issues, is my final result.

An image pasted into a selection in Photoshop.
The final pasted image.
 
02:55:00

How to Keep An Image Centered After Cropping in Photoshop


How to Keep An Image Centered After Cropping in Photoshop


Does Photoshop throw your images off-center after you crop them? This quick tutorial shows you why it happens and how easy it is to fix! For Photoshop 2022 or any recent version.

Written by Steve Patterson.

Is Photoshop not keeping your image centered after you crop it? Is the cropped image snapping into the corner instead of staying centered on the screen? In this tutorial, I show you when it happens, why it happens and how to fix it!

I'm using Photoshop 2022 but this fix applies to any recent version.

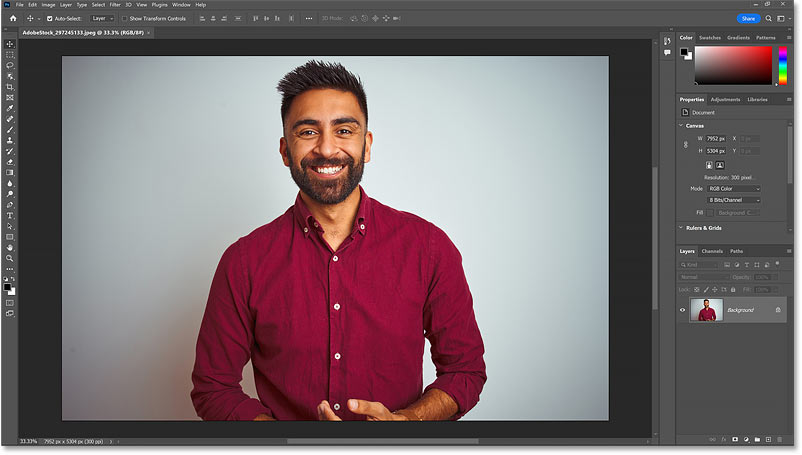
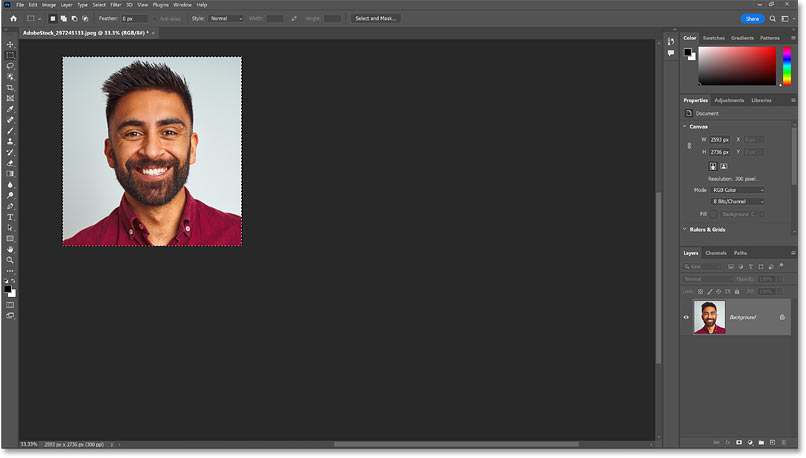
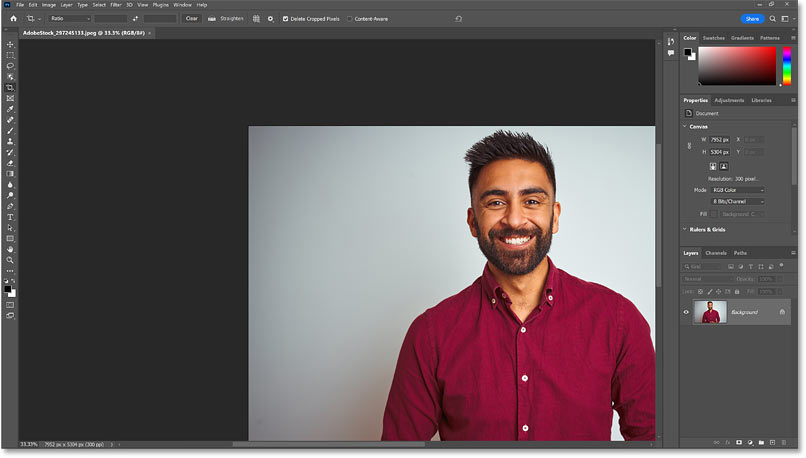
And I'll use this image from Adobe Stock.

The image that will be cropped in Photoshop.
An image waiting to be cropped.
 

The problem: Photoshop not centering images after cropping

First, let’s quickly look at the problem and when you’ll encounter it. There are a few ways to crop an image in Photoshop, and depending on which way you choose, you may not run into this problem. But here are three examples of when you definitely will.

Example 1: Cropping with the Rectangular Marquee Tool

The official way to crop an image in Photoshop is with the Crop Tool which we’ll come back to in a moment. But many people find it easier to crop images with the Rectangular Marquee Tool.

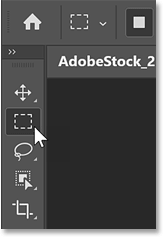
So I’ll select the Rectangular Marquee Tool from the toolbar.

Selecting the Rectangular Marquee Tool from Photoshop's toolbar.
Selecting the Rectangular Marquee Tool.

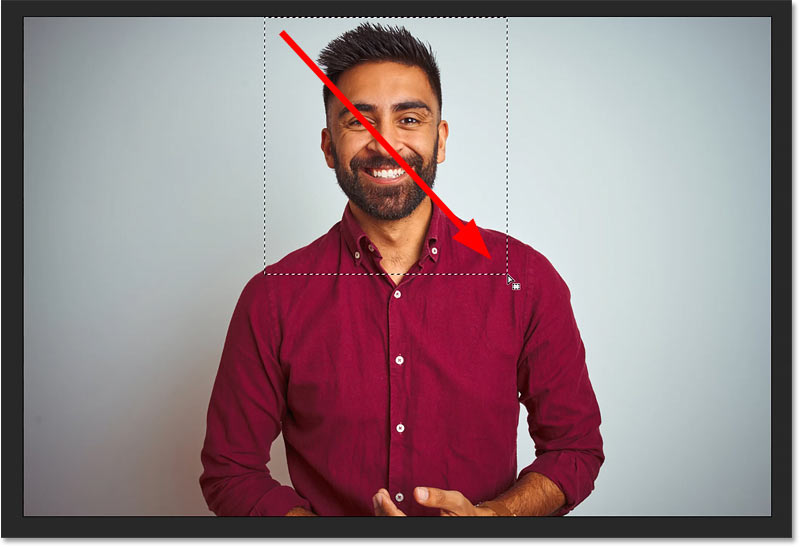
Then I’ll drag out a selection outline around the part of the image I want to keep.

Drawing a rectangular selection outline.

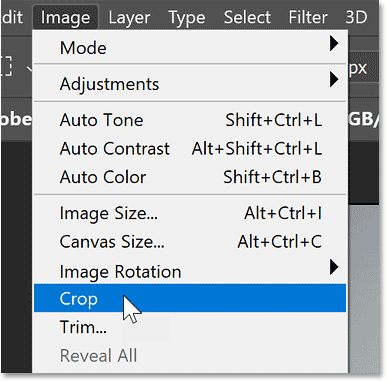
To crop the image, I’ll go up to the Image menu in the Menu Bar and choose Crop.

Selecting the Crop command from the Image menu in Photoshop.
Going to Image > Crop.

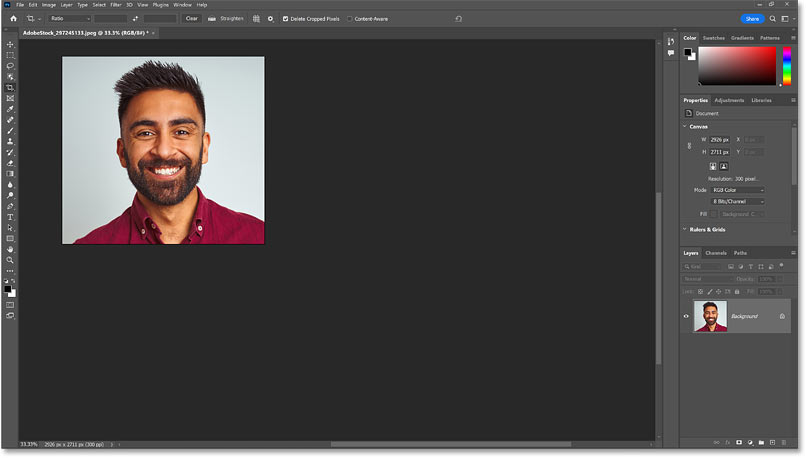
But instead of centering the cropped image, Photoshop snaps it into the upper left of the screen. To recenter it, I would need to drag the image back into the center manually with the Hand Tool.

The image is not centered after cropping with the Rectangular Marquee Tool.

Example 2: Cropping with the Crop Tool in Classic Mode

The same thing happens when cropping images with the Crop Tool if you use the Crop Tool in Classic Mode.

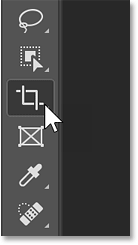
I’ll select the Crop Tool from the toolbar.

Selecting the Crop Tool in Photoshop's toolbar.
Selecting the Crop Tool.

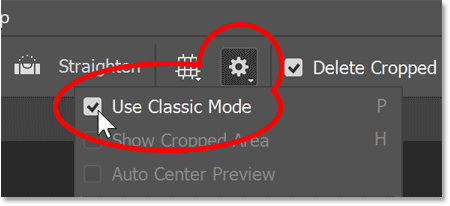
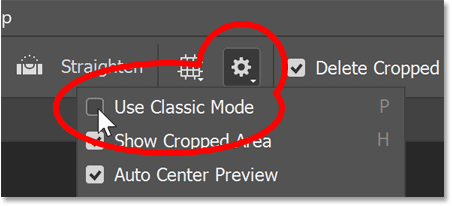
Then in the Options Bar, I’ll click the gear icon and I’ll turn on Use Classic Mode.

Turning on Classic Mode for the Crop Tool.

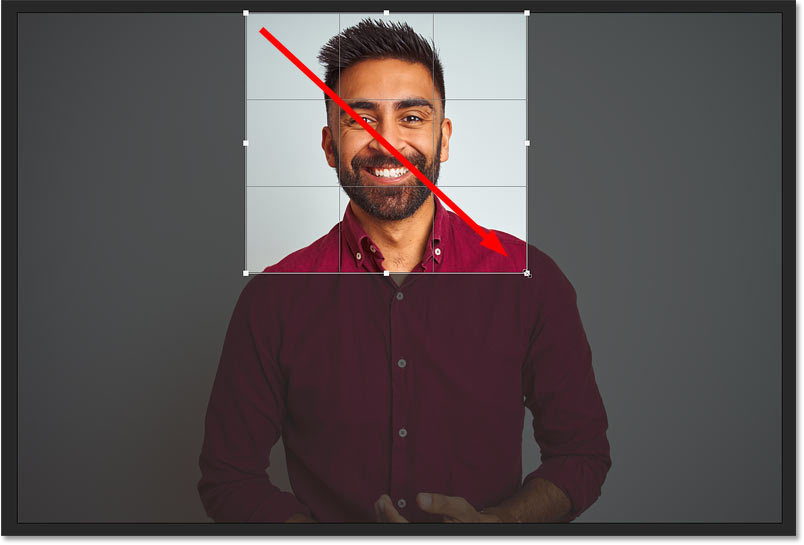
I’ll drag a cropping border around part of the image.

Dragging out a crop border with the Crop Tool in Photoshop
Dragging out a crop border.

Then to crop it, I’ll click the checkmark in the Options Bar.

Clicking the checkmark to commit the crop.
Clicking the checkmark.

And again, Photoshop throws the cropped image into the upper left of the screen.

The image is not centered after cropping with the Crop Tool in Classic Mode.
The image is off-center after cropping with the Crop Tool's Classic Mode.

Example 3: Undoing a crop after cropping with the Crop Tool

Even if the Crop Tool is not in Classic Mode, which is turned off by default, you’ll still run into the problem if you undo your crop.

I’ll keep the Crop Tool selected but in the Options Bar, I’ll turn Classic Mode off.

Turning off Classic Mode for the Crop Tool in Photoshop's Options Bar.
Turning off Classic Mode for the Crop Tool.

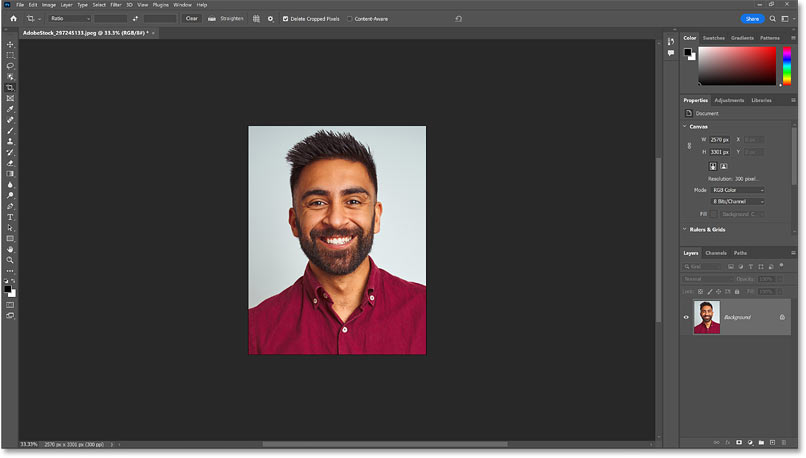
Then I’ll crop the image with the Crop Tool. And with Classic Mode turned off, the cropped image is centered as expected.

The image is centered after cropping with the Crop Tool.

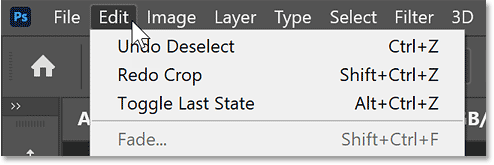
But if you change your mind and undo the crop by going up to the Edit menu and choosing Undo Crop:

Choosing the Undo Crop command in Photoshop.
Going to Edit > Undo Crop.

Photoshop restores the original image but still throws it off-center.

The image is no longer centered after undoing the crop.

The reason images are not centered after cropping

So why, in these examples, did Photoshop not center the image after cropping it? The reason is because of a feature called Overscroll.

Overscroll lets you scroll an image around on your screen even when you are already zoomed out far enough to view the entire image. The idea is that you may still find it easier to inspect different areas, or to work on an area that’s in a corner or along the side, if you can drag that part of the image into the center of your screen.

I cover Overscroll in more detail in my complete How to Zoom Images in Photoshop tutorial.

The solution: Turn Overscroll off

Overscroll is turned on by default. But if it’s not a feature you care about, you can fix the problem of Photoshop not centering images after cropping them by turning Overscroll off. And here’s how to do it.

On a Windows PC (which is what I’m using), go up to the Edit menu. On a Mac, go up to the Photoshop menu.

Going up to the Edit menu in Photoshop.
Go to Edit (Win) / Photoshop (Mac).

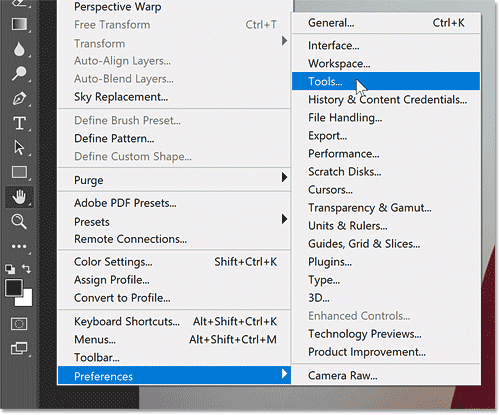
From there, choose Preferences and then Tools.

Opening the Tools preferences in Photoshop.
Going to Preferences > Tools.

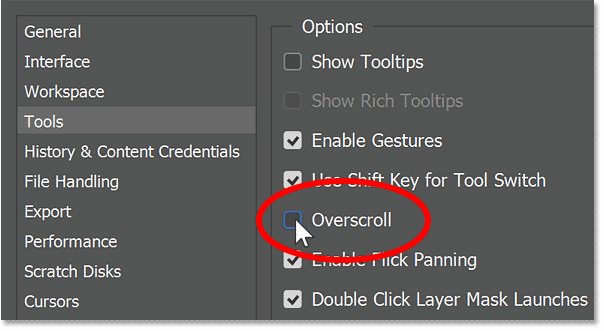
In the Preferences dialog box, look for the Overscroll option and uncheck it to turn it off. Then click OK to accept it and close the dialog box.

Turning off Overscroll in Photoshop.
Unchecking the Overscroll option.

That’s all there is to it! The next time you crop an image, either with the Rectangular Marquee Tool or with the Crop Tool set to Classic Mode, the cropped image will remain centered on your screen.

The cropped image remains centered with Overscroll turned off.