The blend tool in Adobe Illustrator is often used to create abstract
wave graphics, but I’ve been experimenting with some additional
adjustments and discovered some handy tricks to create sci-fi inspired
digital particle waves. This kind of imagery perfectly complements
hi-tech interface designs with colourful data visualisation effects, or
it could be used to create abstract art in its own right. We’ll create
the initial effect in Adobe Illustrator, where I’ll show you a few
options for randomising the result, then switch over to Adobe Photoshop
for some extra colour enhancements to really boost the vibrancy.
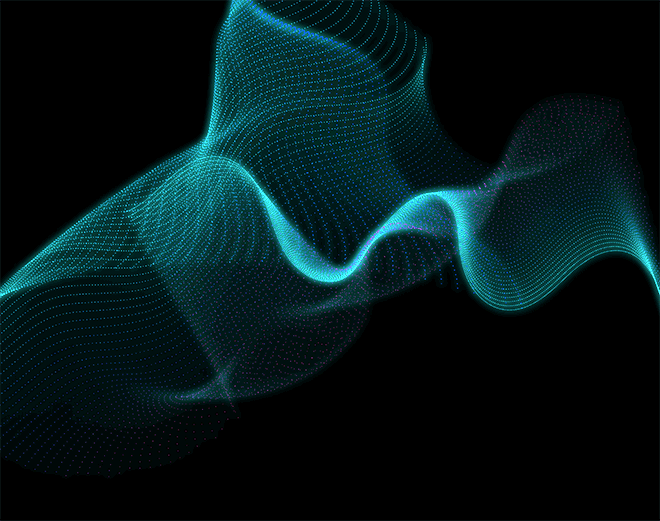
The artwork we’ll be creating as part of this tutorial is an abstract array of particles that flow in various directions. Bright colours that transition across the waves and subtle glow effects add to the sci-fi appearance. The complexity of the final result all depends on the number of adjustments you make to the vector paths. You could create chaotic pieces with particles flowing in all directions, or carefully draw paths to replicate a graph or soundwave.
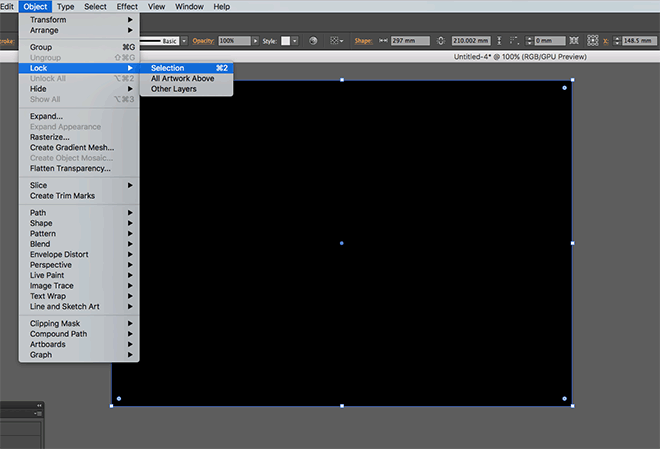
Begin by opening Adobe Illustrator and create a new document. These effects work best against a dark background, so draw a rectangle to cover the artboard, then give it a black fill. Lock the shape in place to avoid accidentally selecting it by using the CMD+2 shortcut, or Object > Lock > Selection menu.
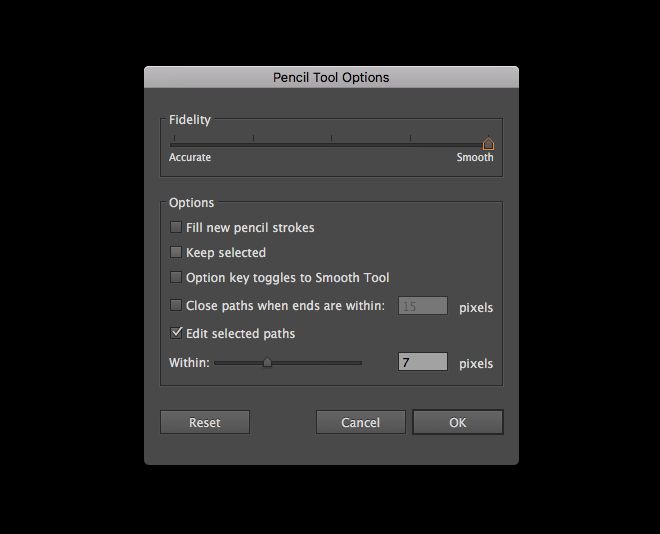
The paths that form the basis of the particle waves can be drawn with precision using the Pen tool, or randomly with the Pencil. When using the Pencil tool, double click the tool icon to edit its options, then max out the Fidelity slider to smoothen the lines.
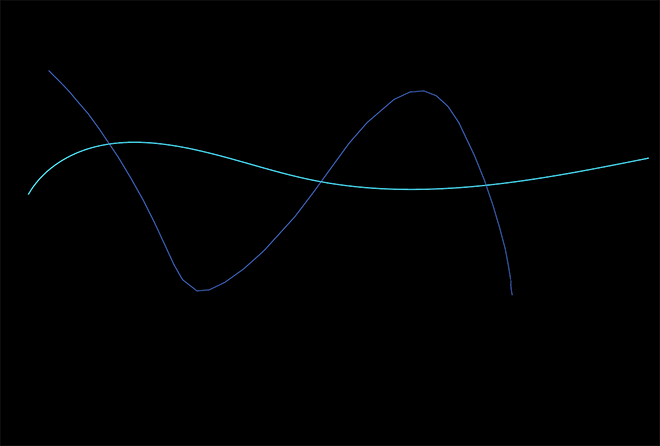
Clear out the fill colour in the toolbar, then set up a vibrant stroke. Draw random flowing lines in a range of directions across the artboard. The Pencil’s smoothing option will iron out any kinks in the initial path.
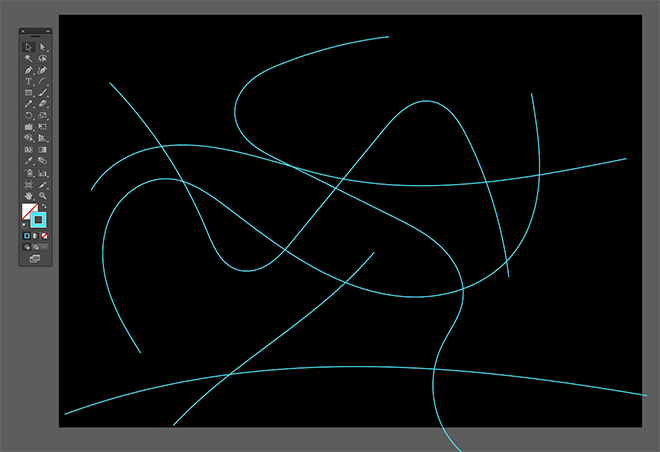
A higher number of paths will result in a more complex result. Experiment with different numbers of paths, as well as various line lengths.
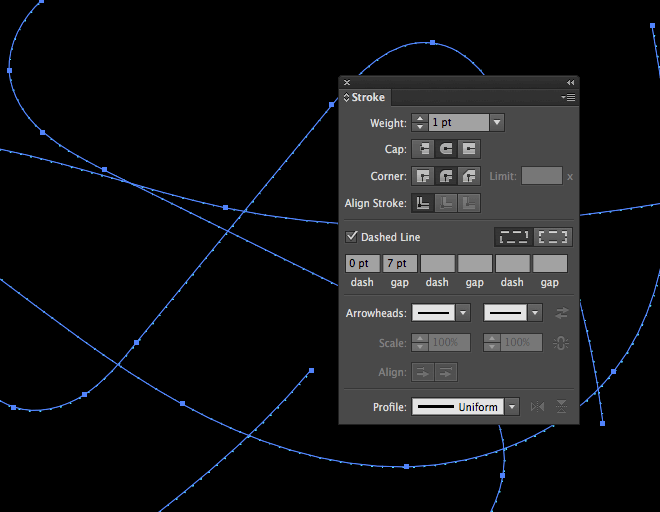
An important step to differentiate this digital particle effect from typical wave graphics made with Illustrator’s Blend tool is to set up a dashed stroke to create a series of dots. Draw a selection across all the paths and enable the round cap option in the Stroke panel, then configure the Dashed Line settings to 0pt Dash and 7pt Gap.
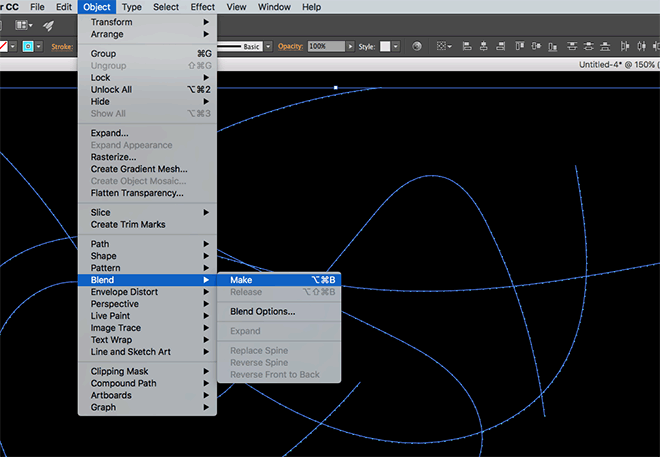
Head to Object > Blend > Make to produce the basic blend effect, then go straight back to Object > Blend > Blend Options.
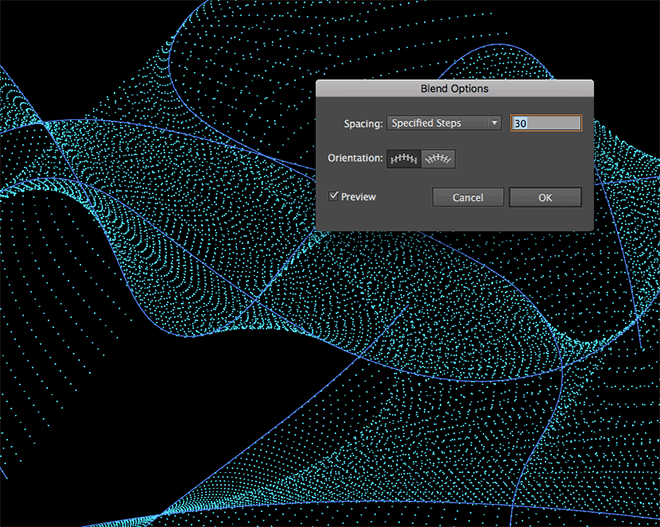
Change the drop down menu to Specified Steps, then turn on the Preview checkbox and alter the number of steps to produce an intricate spread of dots. The higher the number, the more complex the effect will be.
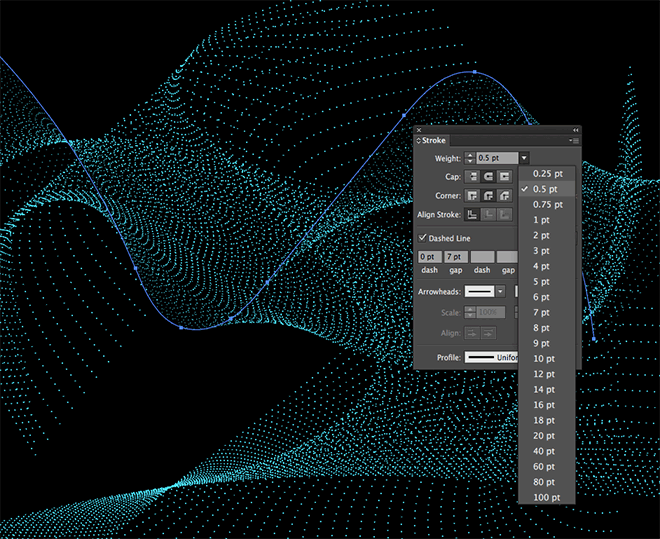
To add some variety to the effect, use the Direct Selection tool to select just a single path, then alter its stroke weight. Make some paths slightly thinner and others thicker. The blending will automatically transition the weight between each path.
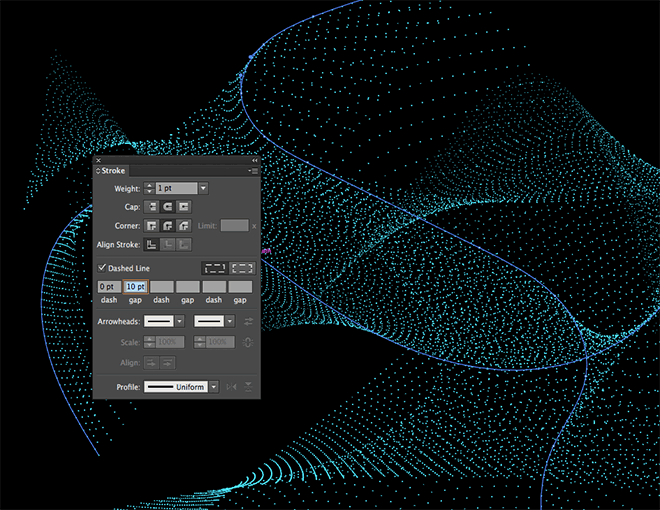
Also experiment with the dashed line options by changing the gap length. This will help prevent the dots from aligning and forming solid lines.
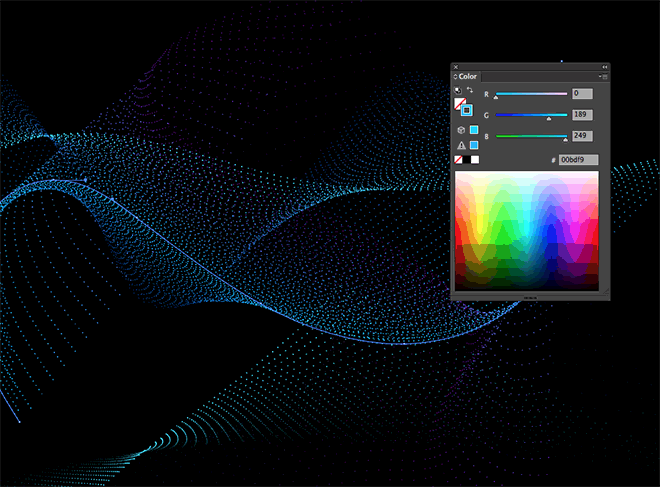
Select each path individually and alter the stroke colour from within the Color panel. Choose bright blues, pinks and yellows for vibrant results.
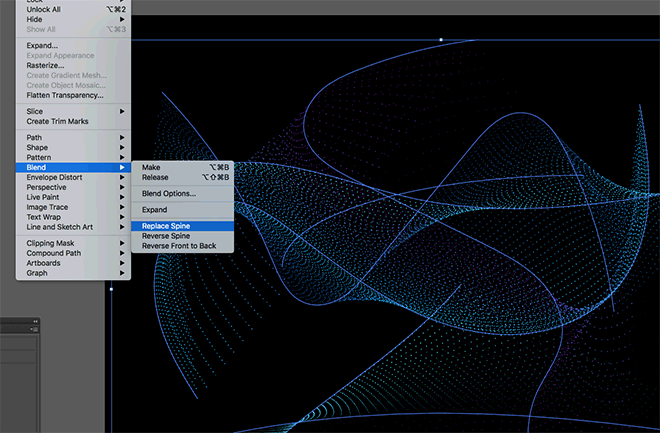
To distort the lines further, draw a random path within the blend, then draw a selection around everything. Go to Object > Blend > Replace Spine.
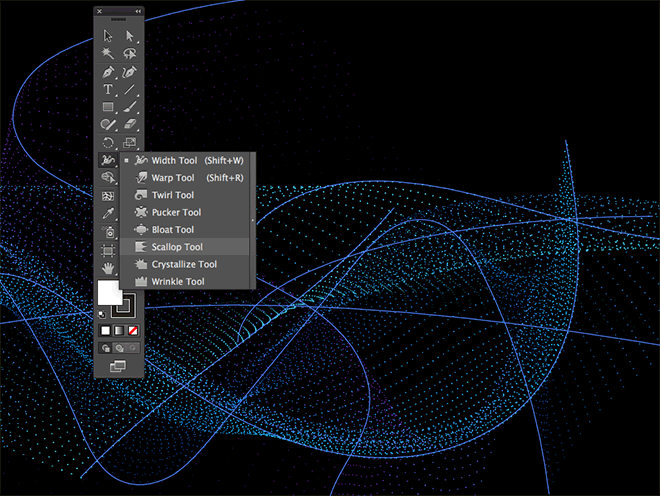
To create really intricate effects, experiment with the Scallop, Crystallize and Wrinkle tools. Double click the tool icon to edit the size settings to cover a large portion of the artwork, then click across the paths to distort them.
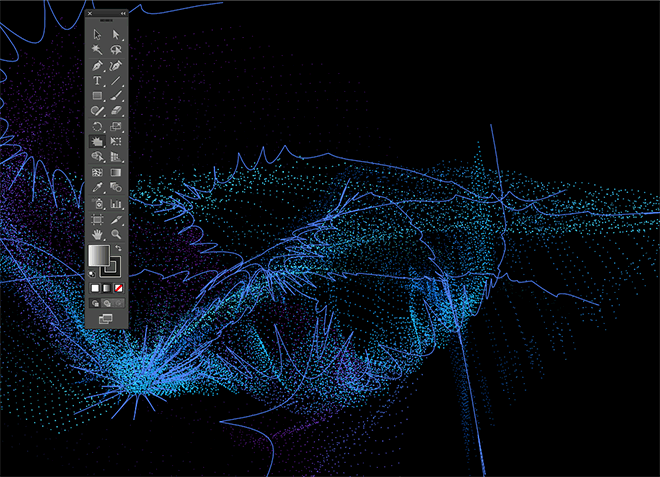
The sharp kinks in the paths cause the particles to flow in all directions, which results in a chaotic spread of dots.
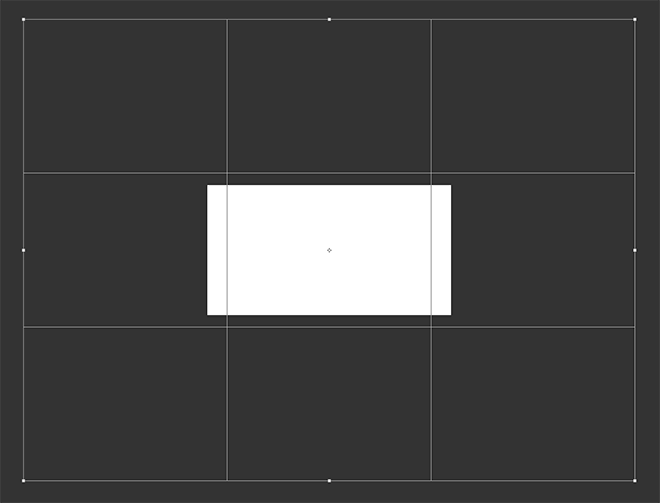
Once you’re happy with the layout of your digital particle wave, make a selection around everything and hit CMD+C to Copy. Open Adobe Photoshop and create a new document. The canvas size will likely be quite small, so use the Crop tool to enlarge it.
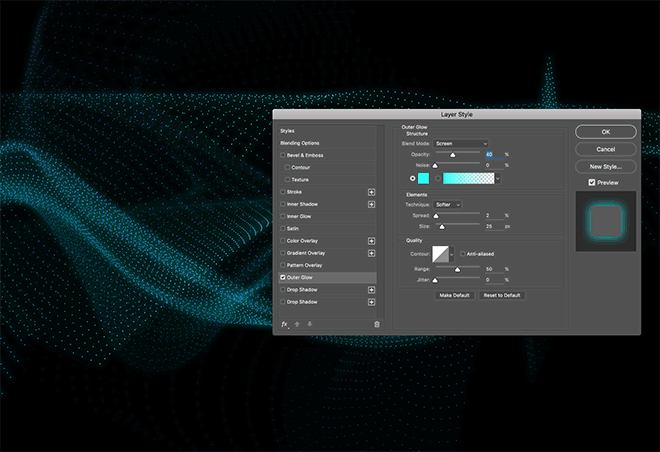
Fill the background with black using the CMD+Backspace shortcut, then paste in the Illustrator artwork. Scale it to size and hit Enter to set it in place. Double click the layer and add an Outer Glow layer style with a bright cyan colour, the Screen blending mode, 2% Spread, 25px Size, then reduce the opacity to tone down the impact of the glow effect.
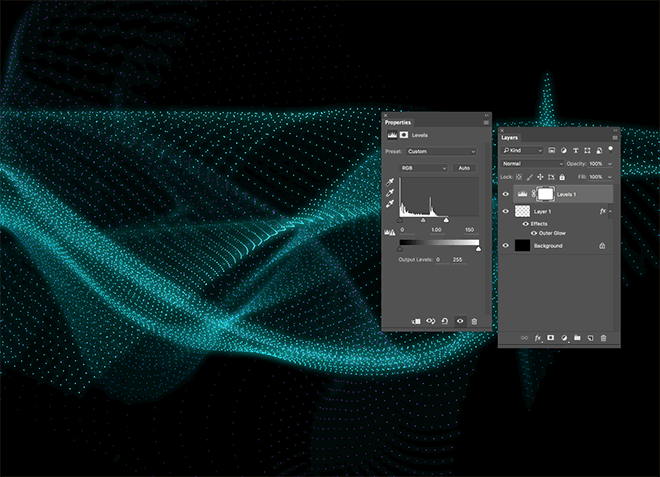
Add a Levels adjustment layer, then move the highlights slider inwards to brighten the artwork, making those sporadic dots easier to see.
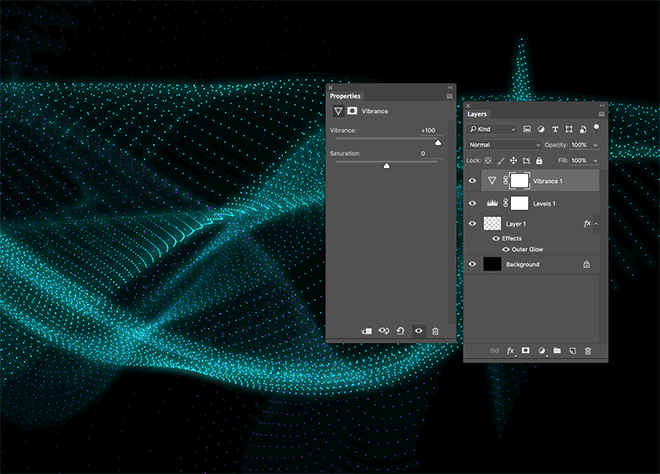
Apply a Vibrance adjustment layer and max out the Vibrance setting to really boost the colours of the artwork.
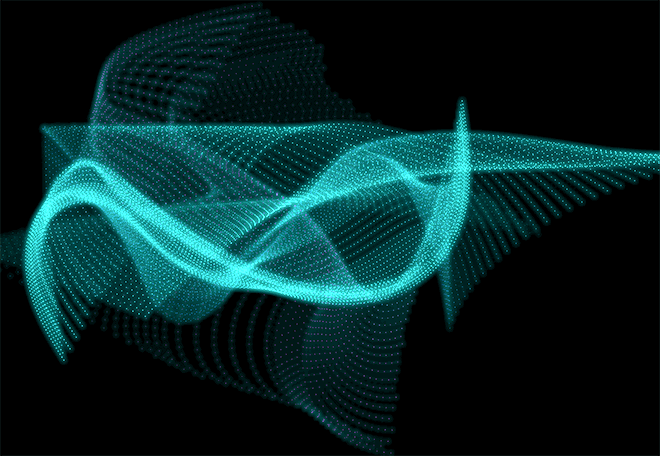
The final result t is a sci-fi inspired digital particle wave with with an array of bright glowing dots. While most of those final Photoshop adjustments could have been made directly in Illustrator, the complexity of the artwork would soon cause memory issues.

What makes these techniques so much fun is a different result can be achieved every time by simply randomising the initial path shape, length and number, as well as applying a variety of further adjustments with replacement spines and path distortions.

The artwork we’ll be creating as part of this tutorial is an abstract array of particles that flow in various directions. Bright colours that transition across the waves and subtle glow effects add to the sci-fi appearance. The complexity of the final result all depends on the number of adjustments you make to the vector paths. You could create chaotic pieces with particles flowing in all directions, or carefully draw paths to replicate a graph or soundwave.

Begin by opening Adobe Illustrator and create a new document. These effects work best against a dark background, so draw a rectangle to cover the artboard, then give it a black fill. Lock the shape in place to avoid accidentally selecting it by using the CMD+2 shortcut, or Object > Lock > Selection menu.

The paths that form the basis of the particle waves can be drawn with precision using the Pen tool, or randomly with the Pencil. When using the Pencil tool, double click the tool icon to edit its options, then max out the Fidelity slider to smoothen the lines.

Clear out the fill colour in the toolbar, then set up a vibrant stroke. Draw random flowing lines in a range of directions across the artboard. The Pencil’s smoothing option will iron out any kinks in the initial path.

A higher number of paths will result in a more complex result. Experiment with different numbers of paths, as well as various line lengths.

An important step to differentiate this digital particle effect from typical wave graphics made with Illustrator’s Blend tool is to set up a dashed stroke to create a series of dots. Draw a selection across all the paths and enable the round cap option in the Stroke panel, then configure the Dashed Line settings to 0pt Dash and 7pt Gap.

Head to Object > Blend > Make to produce the basic blend effect, then go straight back to Object > Blend > Blend Options.

Change the drop down menu to Specified Steps, then turn on the Preview checkbox and alter the number of steps to produce an intricate spread of dots. The higher the number, the more complex the effect will be.

To add some variety to the effect, use the Direct Selection tool to select just a single path, then alter its stroke weight. Make some paths slightly thinner and others thicker. The blending will automatically transition the weight between each path.

Also experiment with the dashed line options by changing the gap length. This will help prevent the dots from aligning and forming solid lines.

Select each path individually and alter the stroke colour from within the Color panel. Choose bright blues, pinks and yellows for vibrant results.

To distort the lines further, draw a random path within the blend, then draw a selection around everything. Go to Object > Blend > Replace Spine.

To create really intricate effects, experiment with the Scallop, Crystallize and Wrinkle tools. Double click the tool icon to edit the size settings to cover a large portion of the artwork, then click across the paths to distort them.

The sharp kinks in the paths cause the particles to flow in all directions, which results in a chaotic spread of dots.

Once you’re happy with the layout of your digital particle wave, make a selection around everything and hit CMD+C to Copy. Open Adobe Photoshop and create a new document. The canvas size will likely be quite small, so use the Crop tool to enlarge it.

Fill the background with black using the CMD+Backspace shortcut, then paste in the Illustrator artwork. Scale it to size and hit Enter to set it in place. Double click the layer and add an Outer Glow layer style with a bright cyan colour, the Screen blending mode, 2% Spread, 25px Size, then reduce the opacity to tone down the impact of the glow effect.

Add a Levels adjustment layer, then move the highlights slider inwards to brighten the artwork, making those sporadic dots easier to see.

Apply a Vibrance adjustment layer and max out the Vibrance setting to really boost the colours of the artwork.

The final result t is a sci-fi inspired digital particle wave with with an array of bright glowing dots. While most of those final Photoshop adjustments could have been made directly in Illustrator, the complexity of the artwork would soon cause memory issues.

What makes these techniques so much fun is a different result can be achieved every time by simply randomising the initial path shape, length and number, as well as applying a variety of further adjustments with replacement spines and path distortions.


No comments:
Post a Comment