Textures are a common addition to vintage style logo designs
and type designs. Designers use them to mimic the aesthetics of old
prints and handmade art to give their digital artwork more of a tactile
appearance. There’s a number of techniques that can be used to apply
textures to your designs in Adobe Photoshop, using built-in filters and
effects, or tools such as textures and Photoshop Brushes. In today’s
tutorial I show three ways you can distress your logos and text, each
resulting in a slightly different appearance.

Before we get onto texturing, there’s a couple of really cool filters that can be applied to your artwork to replicate the appearance of ink bleed. Real letterpress prints don’t retain those sharp and crisp edges. Rather, the ink bleeds slightly into the paper stock, causing the edges to become fuzzy and distorted. Mimicking this appearance in Photoshop is a great first step to creating realistic vintage effects.
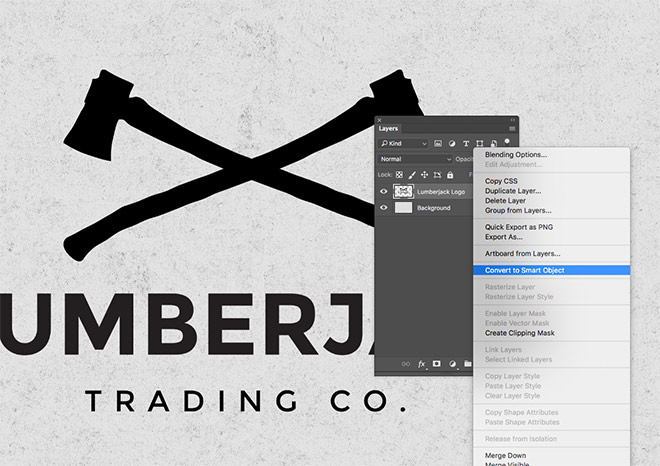
Begin by converting your artwork into a Smart Object. This will allow you to non-destructively makes edits, so you can remove them if you need to. It also gives you the option to edit the settings of each filter, to fine tune the final result.
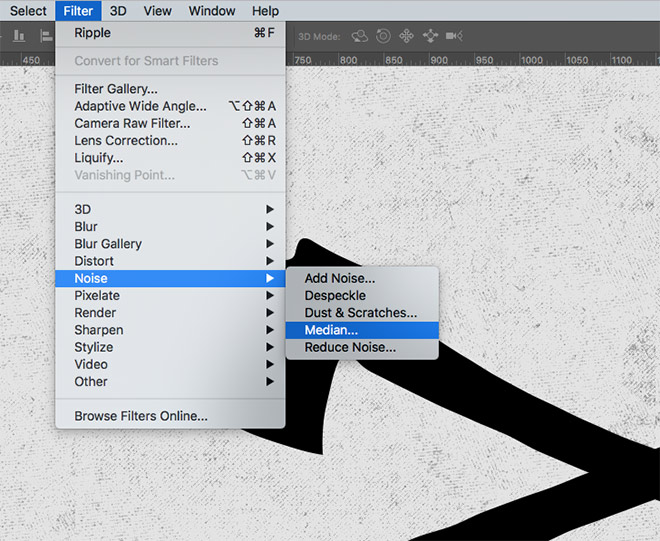
The first filter to add is under the Filter > Noise > Median menu. This effect will remove the sharp corners of the artwork, and looks particularly good when applied to text to replicate a hand-lettered appearance.
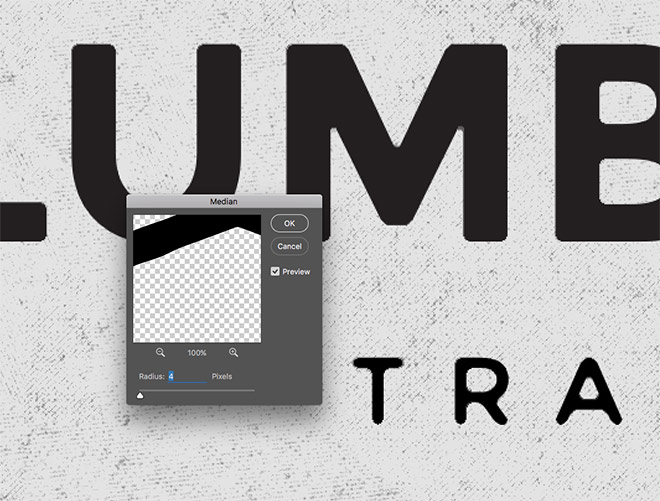
Enter a small radius value and see the result in the preview window. A figure of 3-4px will be just enough to subtly round the corners while retaining legibility.
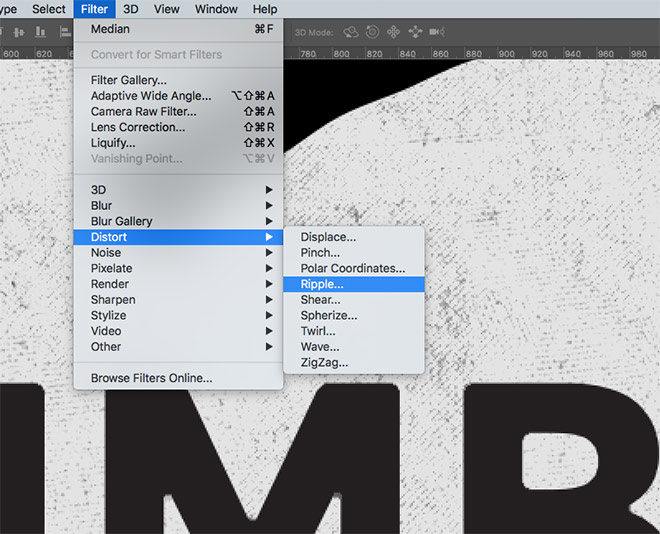
The next filter to apply is under the Filter > Distort > Ripple menu. This effect will give the artwork an irregular outline.
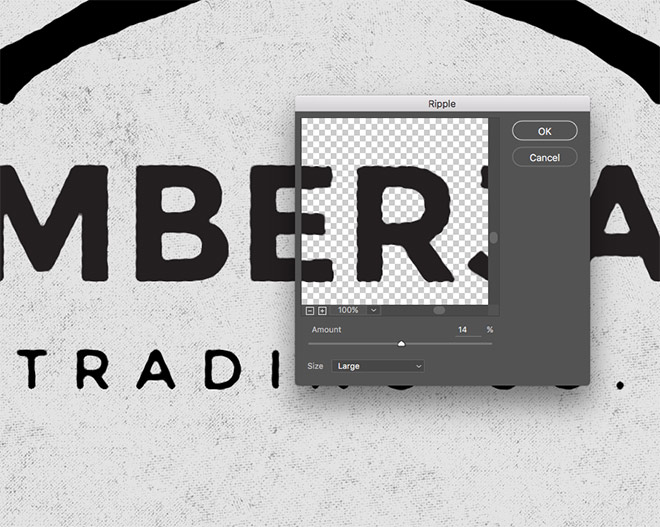
Change the dropdown menu to Large, then move the slider to around 14-15%. Keep an eye on the preview window to see the final result. Be sure to navigate around the artwork to check the distortion amount doesn’t affect smaller elements too much.
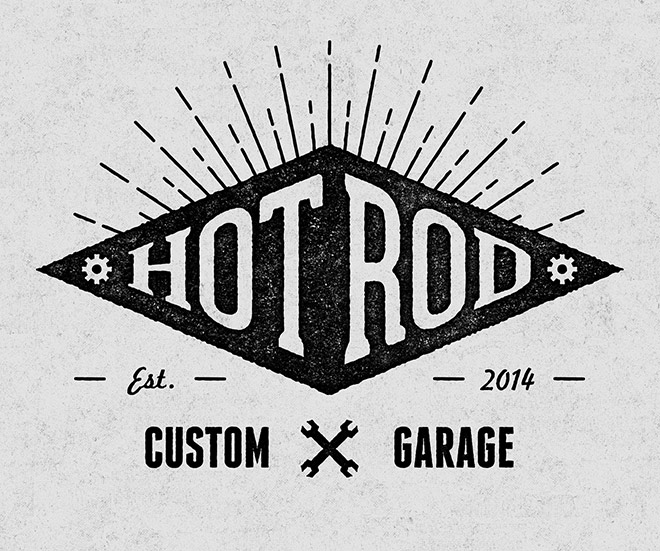
The first texturing technique we’ll look at makes use of Photoshop Brushes. The main advantage of using brushes over textures and filters is you have complete control over the amount and variance of the texture spread. To texture your artwork with Photoshop Brushes, you’ll first need to add some brushes to your Brushes library. My Free Subtle Grunge Texture Brushes should get you started.
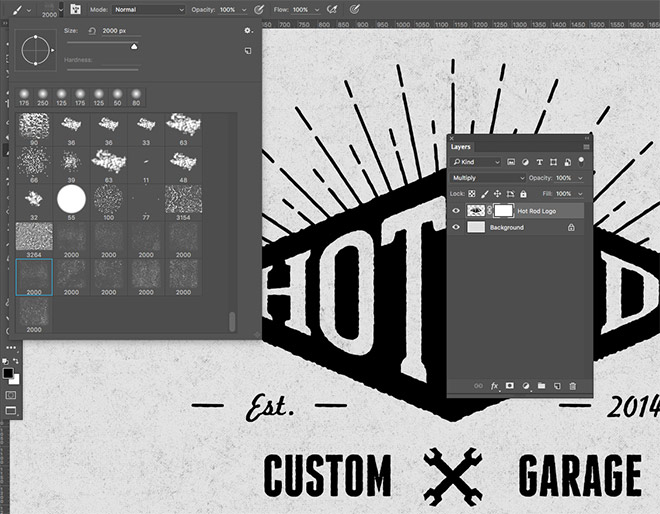
Add a Layer Mask to your artwork in Adobe Photoshop, then activate the Brush tool. Choose a texture brush from your library selection and adjust the size as appropriate.
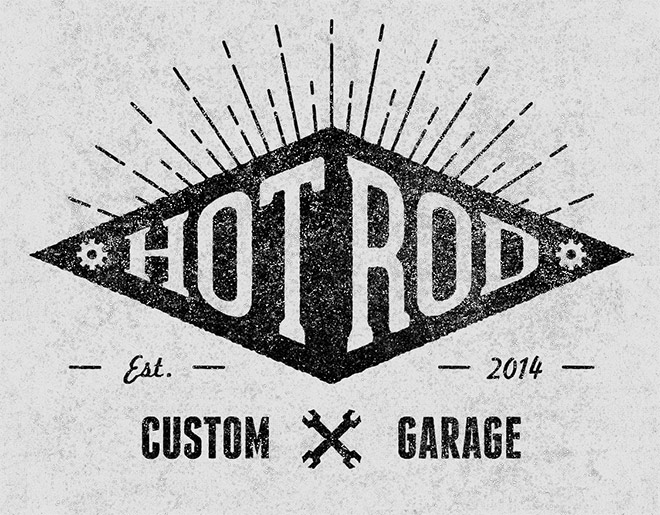
Texture can be added with a single click using a large brush that covers the entire design, or painted with a series of smaller brush dabs in specific areas.
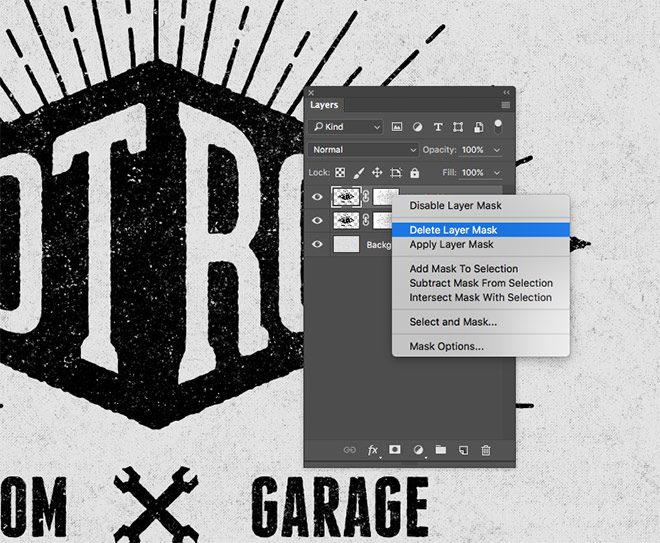
A great finishing touch that really enhances the stamped appearance is to add a darker outline around the design. Duplicate the layer, then right click and delete the Layer Mask.
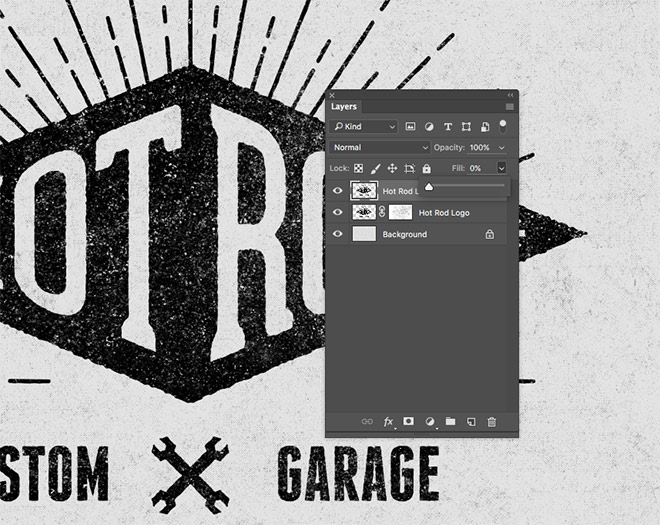
Reduce the Fill amount to zero from within the Layers panel to make this duplicate artwork completely invisible.
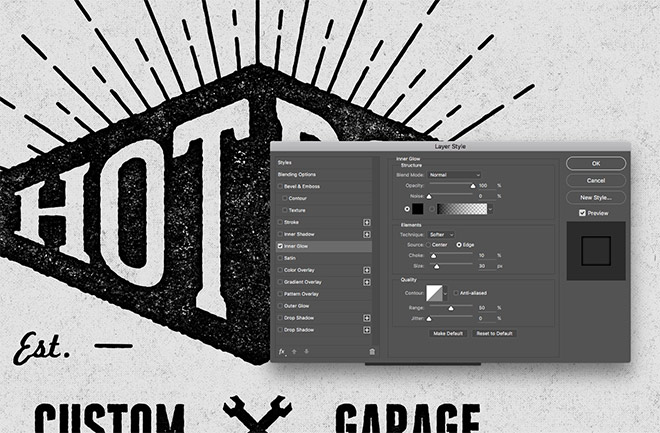
Double click the duplicate layer and add an Inner Glow layer style. Configure the options to Normal, 100% Opacity, Black, Edge, then alter the Choke and Size sliders to apply a subtle black outline.
It makes sense to use textures from the real world to add texturing effects to your digital art. They can often achieve the most realistic results, especially if the texture image matches the visual style you’re trying to create. For instance, what better to replicate an inked appearance than an actual ink texture?!
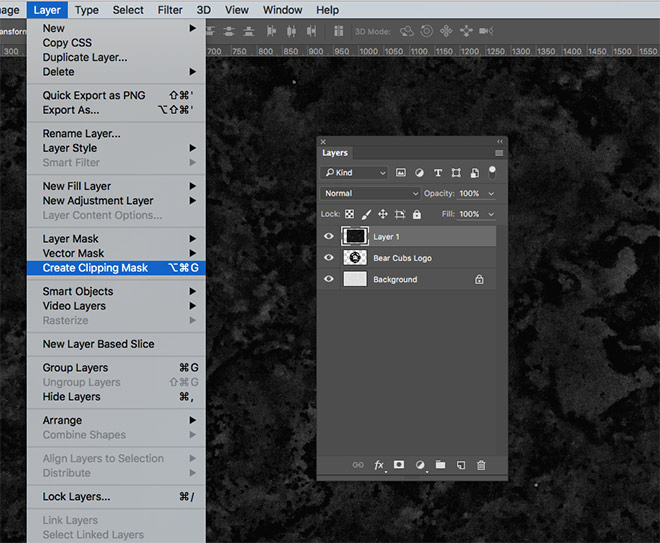
Paste your texture image on a new layer above your artwork. Go to Layer > Make Clipping Mask (or ALT+Click between the two layers). This clipping mask will restrict the texture to the outline of your design.
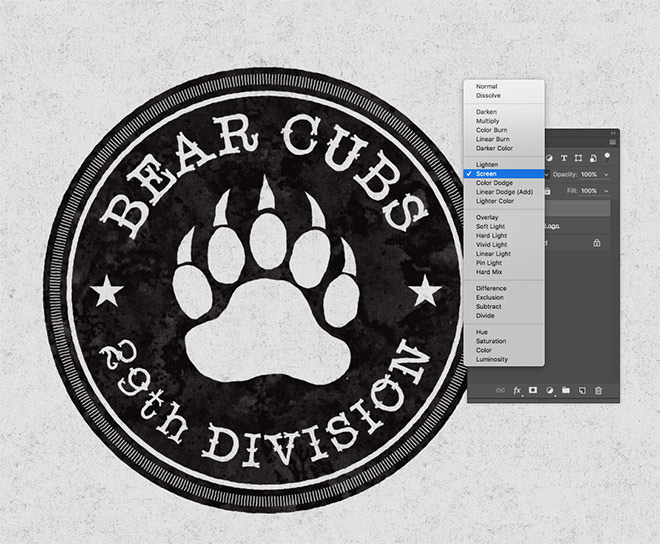
Change the Blending mode of the texture to Screen for dark textures, or Multiply for light textures to render the background transparent.
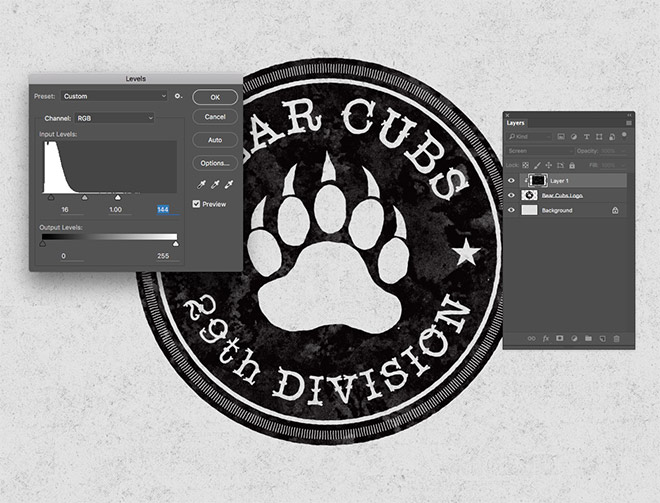
You can increase the contrast of a texture by adjusting the Levels (CMD+L). Move the shadows and highlights slider inwards to bring out the details.
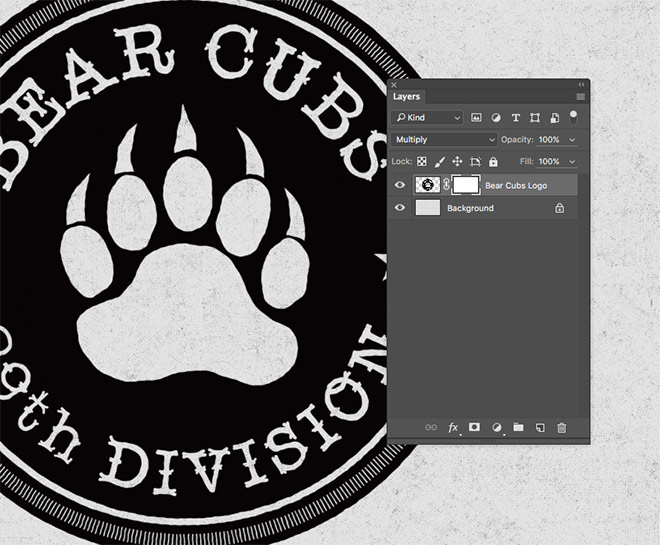
Alternatively, a texture can be applied within a Layer Mask rather than a Clipping Mask.
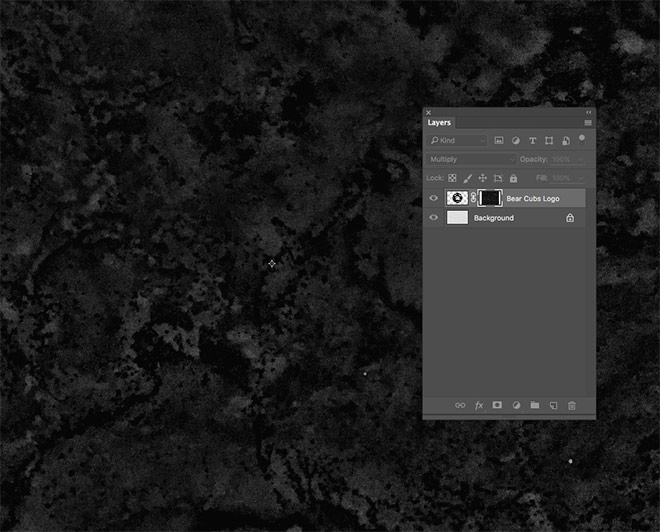
Hold the ALT key while clicking on the Layer Mask thumbnail to edit its contents, then paste your texture into the mask directly.
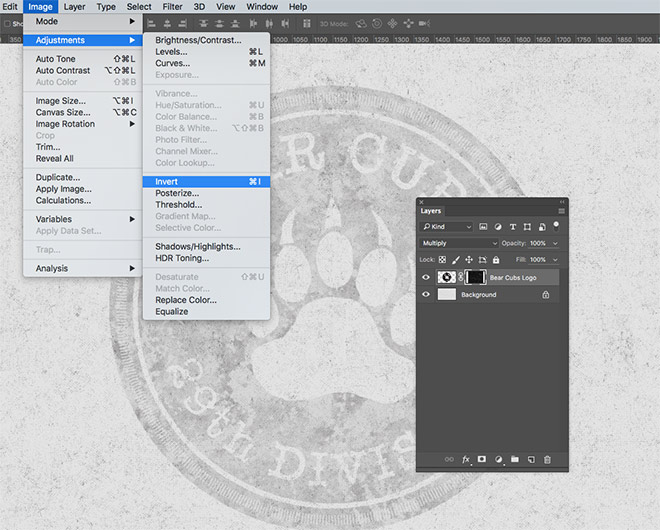
Masks work by erasing black areas while showing the white bits, so the dark texture in my example needs to be inverted.

Whilst Brushes and Textures can generate great effects, they require the use of third party resources. Sometimes it’s useful to produce effects entirely with Photoshop’s array of filters. Each setting can be finely tuned to fully customise the final appearance, and can be replicated across multiple layers.
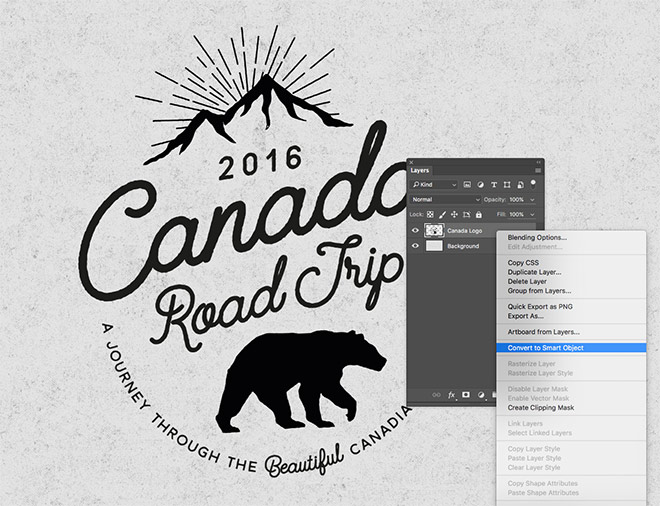
Begin by converting your artwork into a Smart Object to non-destructively apply the changes and benefit from the ability to adjust the filter settings.
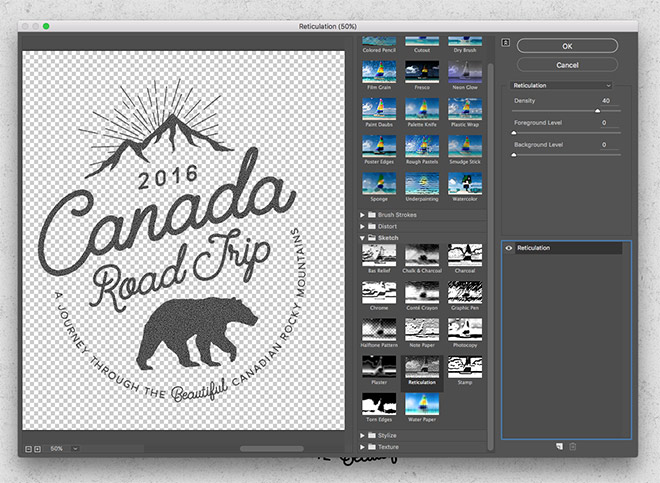
Go to Filter > Filter Gallery and apply a Reticulation effect from under the Sketch category. Change the Density to around 40, then change both Level values to 0.
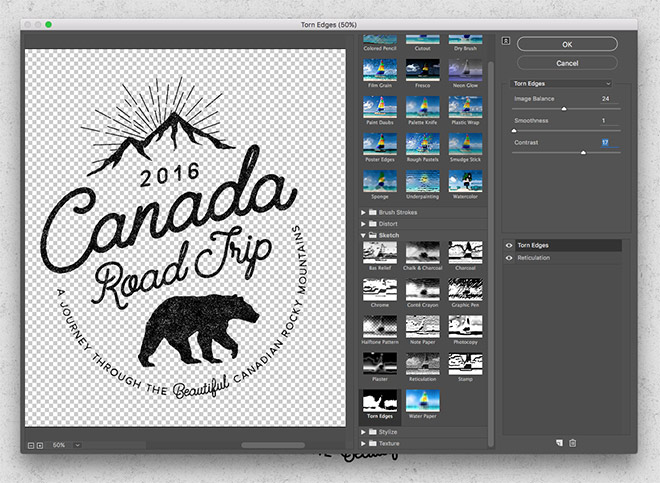
Click the New Effect Layer icon, then add a Torn Edges effect. Change the values to 24 Image Balance, 1 Smoothness and 17 Contrast, then fine tune the results by moving the sliders to find the perfect amount of grain.
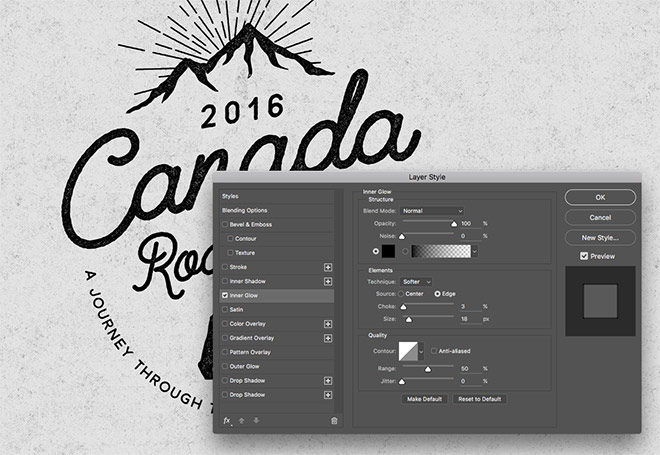
An Inner Glow effect can be applied by double clicking the artwork layer. Change the settings to Normal, 100% Opacity, Black, Edge, then alter the Choke and Size sliders to replicate the subtle outline seen on stamped and letterpress prints.
Initial Ink Bleed Effects

Before we get onto texturing, there’s a couple of really cool filters that can be applied to your artwork to replicate the appearance of ink bleed. Real letterpress prints don’t retain those sharp and crisp edges. Rather, the ink bleeds slightly into the paper stock, causing the edges to become fuzzy and distorted. Mimicking this appearance in Photoshop is a great first step to creating realistic vintage effects.

Begin by converting your artwork into a Smart Object. This will allow you to non-destructively makes edits, so you can remove them if you need to. It also gives you the option to edit the settings of each filter, to fine tune the final result.

The first filter to add is under the Filter > Noise > Median menu. This effect will remove the sharp corners of the artwork, and looks particularly good when applied to text to replicate a hand-lettered appearance.

Enter a small radius value and see the result in the preview window. A figure of 3-4px will be just enough to subtly round the corners while retaining legibility.

The next filter to apply is under the Filter > Distort > Ripple menu. This effect will give the artwork an irregular outline.

Change the dropdown menu to Large, then move the slider to around 14-15%. Keep an eye on the preview window to see the final result. Be sure to navigate around the artwork to check the distortion amount doesn’t affect smaller elements too much.
Texturing using Photoshop Brushes

The first texturing technique we’ll look at makes use of Photoshop Brushes. The main advantage of using brushes over textures and filters is you have complete control over the amount and variance of the texture spread. To texture your artwork with Photoshop Brushes, you’ll first need to add some brushes to your Brushes library. My Free Subtle Grunge Texture Brushes should get you started.

Add a Layer Mask to your artwork in Adobe Photoshop, then activate the Brush tool. Choose a texture brush from your library selection and adjust the size as appropriate.

Texture can be added with a single click using a large brush that covers the entire design, or painted with a series of smaller brush dabs in specific areas.

A great finishing touch that really enhances the stamped appearance is to add a darker outline around the design. Duplicate the layer, then right click and delete the Layer Mask.

Reduce the Fill amount to zero from within the Layers panel to make this duplicate artwork completely invisible.

Double click the duplicate layer and add an Inner Glow layer style. Configure the options to Normal, 100% Opacity, Black, Edge, then alter the Choke and Size sliders to apply a subtle black outline.
Texturing using Texture Images

It makes sense to use textures from the real world to add texturing effects to your digital art. They can often achieve the most realistic results, especially if the texture image matches the visual style you’re trying to create. For instance, what better to replicate an inked appearance than an actual ink texture?!

Paste your texture image on a new layer above your artwork. Go to Layer > Make Clipping Mask (or ALT+Click between the two layers). This clipping mask will restrict the texture to the outline of your design.

Change the Blending mode of the texture to Screen for dark textures, or Multiply for light textures to render the background transparent.

You can increase the contrast of a texture by adjusting the Levels (CMD+L). Move the shadows and highlights slider inwards to bring out the details.

Alternatively, a texture can be applied within a Layer Mask rather than a Clipping Mask.

Hold the ALT key while clicking on the Layer Mask thumbnail to edit its contents, then paste your texture into the mask directly.

Masks work by erasing black areas while showing the white bits, so the dark texture in my example needs to be inverted.
Texturing using Photoshop Filters

Whilst Brushes and Textures can generate great effects, they require the use of third party resources. Sometimes it’s useful to produce effects entirely with Photoshop’s array of filters. Each setting can be finely tuned to fully customise the final appearance, and can be replicated across multiple layers.

Begin by converting your artwork into a Smart Object to non-destructively apply the changes and benefit from the ability to adjust the filter settings.

Go to Filter > Filter Gallery and apply a Reticulation effect from under the Sketch category. Change the Density to around 40, then change both Level values to 0.

Click the New Effect Layer icon, then add a Torn Edges effect. Change the values to 24 Image Balance, 1 Smoothness and 17 Contrast, then fine tune the results by moving the sliders to find the perfect amount of grain.

An Inner Glow effect can be applied by double clicking the artwork layer. Change the settings to Normal, 100% Opacity, Black, Edge, then alter the Choke and Size sliders to replicate the subtle outline seen on stamped and letterpress prints.


No comments:
Post a Comment